 I made a bunch of fun Valentine's Day cards.
Showing posts with label greeting cards. Show all posts
Showing posts with label greeting cards. Show all posts
Wednesday, February 6, 2013
Sunday, December 23, 2012

Friday, December 7, 2012
Make a Large Christmas Card
 I was so excited when I found the perfect envelopes
for our client who prefers to send out big Christmas cards. What I
mean by "big" is that he prefers the cards to be 5-1/2" x 8-1/2" instead
of the usual 5-1/2" x 4-1/4". I came up with this card, which is
based on a card that is featured on page 20 of Stampin' Up's 2012 Holiday Catalog.
I was so excited when I found the perfect envelopes
for our client who prefers to send out big Christmas cards. What I
mean by "big" is that he prefers the cards to be 5-1/2" x 8-1/2" instead
of the usual 5-1/2" x 4-1/4". I came up with this card, which is
based on a card that is featured on page 20 of Stampin' Up's 2012 Holiday Catalog.He was thrilled!
Wednesday, March 14, 2012
Purple Flip-Up Card
 I'm so tired of making the typical 5-1/2" x 4-1/4" card! So here is my shot at a flip-up card:
Tuesday, February 28, 2012
Beautiful Color Combos
 Aren't they beautiful? Every year, Stampin' Up! comes out with five
new colors that are only available for a limited time. I am totally in
love with this year's combinations. Here's a look at the old
stand-by Early Espresso combined with three of the new colors: Lucky
Limeade, Calypso Coral, and Wisteria Wonder. I'm in love, love, love!
Aren't they beautiful? Every year, Stampin' Up! comes out with five
new colors that are only available for a limited time. I am totally in
love with this year's combinations. Here's a look at the old
stand-by Early Espresso combined with three of the new colors: Lucky
Limeade, Calypso Coral, and Wisteria Wonder. I'm in love, love, love!Monday, February 27, 2012
Use Your Scraps
 Remember this post,
where I showed you how to make paper rosettes? I mentioned that after
you die-cut the scallop circles, you would have little parts of the
smaller scallop circle left over.
Remember this post,
where I showed you how to make paper rosettes? I mentioned that after
you die-cut the scallop circles, you would have little parts of the
smaller scallop circle left over. Wednesday, February 22, 2012
Make a First Holy Communion Card
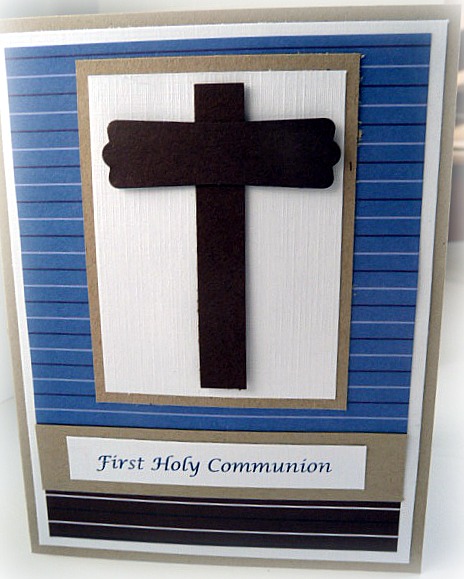 I was contacted by a new client to make invitations for her son's
first Holy Communion. Big challenge for me...I realized that I don't
have any religious paraphernalia in my papercrafting supplies.
I was contacted by a new client to make invitations for her son's
first Holy Communion. Big challenge for me...I realized that I don't
have any religious paraphernalia in my papercrafting supplies.I always love to take on a new challenge. I wanted to make sure the card was appropriate for a little boy. Several of the crucifix stamps that I could find were either too intricate or had lots of flowers and vines on them.
I decided to use a punch to create a cross and print the words "First Holy Communion" instead of trying to find the right stamps.
Tuesday, February 14, 2012
Baby Shower Invitation
I just completed a job for a client who requested "fun" and
"different" invitations for a baby shower. She didn't want the printed
ones that you can order online. (Woo hoo!)
I emailed her a couple of choices. The first sample started out just being a "onesie" card, but I thought it needed to be more than that. I cut the onesie into two pieces. That way I was able to get two cards from one "onesie" (are you confused yet?!) and there would be more room inside the invitation for the wording.

I also sent her this old stand-by as another choice:

She suggested onesies and a clothesline, so I came up with this, and it was the winner!

So fun to make!
I emailed her a couple of choices. The first sample started out just being a "onesie" card, but I thought it needed to be more than that. I cut the onesie into two pieces. That way I was able to get two cards from one "onesie" (are you confused yet?!) and there would be more room inside the invitation for the wording.
I also sent her this old stand-by as another choice:
She suggested onesies and a clothesline, so I came up with this, and it was the winner!
So fun to make!
Friday, January 27, 2012
Dazzling Details
Have you ever discovered something new and then asked yourself, "How
in the world did I live this long without this?" Well, once you add Dazzling Details glitter glue to your projects, you will definitely know what I mean.

Monday, December 12, 2011
Make a Large Christmas Card with a LOT of Bling
Most handmade cards are made
by using 1/2 sheet of 8-1/2" x 11" cardstock. This makes the card end
up measuring 4-1/4" x 5-1/2". (Like the size of an invitation.)
One of my clients requested bigger cards this year. Hmmmm....that is a challenge! I'm just so used to making standard-sized cards that it is difficult for me to "think bigger."
What I decided to do was to use a smaller card and just add some additional background elements to make the card bigger.

I used an entire sheet of cardstock for the card, so the final card measures 5-1/2" x 8-1/2". Yes, it is a lot of paper, but I like the results!
For the bling, I used glittery cardstock, which meant no messing around with glue and glitter.

A nice little touch of bling at the top of the card to pull it all together and balance the colors:

Coming up on Tuesday: supply list. There are tons of supplies for this card, but don't let that scare you! Promise?
One of my clients requested bigger cards this year. Hmmmm....that is a challenge! I'm just so used to making standard-sized cards that it is difficult for me to "think bigger."
What I decided to do was to use a smaller card and just add some additional background elements to make the card bigger.
I used an entire sheet of cardstock for the card, so the final card measures 5-1/2" x 8-1/2". Yes, it is a lot of paper, but I like the results!
For the bling, I used glittery cardstock, which meant no messing around with glue and glitter.
A nice little touch of bling at the top of the card to pull it all together and balance the colors:
Coming up on Tuesday: supply list. There are tons of supplies for this card, but don't let that scare you! Promise?
Friday, November 4, 2011
Thanksgiving Card: Tutorial
Remember this
cute little goose? It is a stamp that is part of the "Cherish
Friendship" stamp set. This cute little bowl of cherries is also a part
of the set. Can I just tell you that I was up until 1 am making a
bunch of these? Trust me, it's a fun card to make! Too bad our
Thanksgiving plans won't be very exciting this year. I would have loved
to have given them to my aunt as a thank-you for hosting us. :(
I've listed the supplies and cardstock measurements below.


Supplies:


Cherish Friendship stamp set
Blender Pens
Watercolor Pencils
Well-Worn Designer Series Paper
Linen Thread
Watercolor Paper
River Rock card stock
Cajun Craze card stock
Stazon Ink
Stazon Cleaner
Measurements:
Start with a piece of 4-1/4" x 11" cardstock, scored at 5-1/2"

I've listed the supplies and cardstock measurements below.
Supplies:
Cherish Friendship stamp set
Blender Pens
Watercolor Pencils
Well-Worn Designer Series Paper
Linen Thread
Watercolor Paper
River Rock card stock
Cajun Craze card stock
Stazon Ink
Stazon Cleaner
Measurements:
Start with a piece of 4-1/4" x 11" cardstock, scored at 5-1/2"
Thursday, September 22, 2011
Invitation for My Dad & His Brother's 75th Birthday Party: Tutorial
I finished the invitations for the upcoming birthday bash in honor of
my dad and his twin brother's 75th birthday. It really is quite
challenging to combine creativity with age-appropriateness. Birthday
party invitations usually call for balloons and confetti and fun stuff
like that. However, those things really didn't seem to fit. This is
what I came up with. It is really easy to make. Take a look:

I used drywall tape to break up the plain blue background. I'm telling you, every papercrafter needs to have drywall tape on-hand.

They have lived on opposite sides of the country pretty much all of their lives, so there really aren't many pictures of just the two of them together. I thought this baby picture was cute, no?

I love this denim ribbon by Stampin' Up! I wish I could buy/make denim-looking paper. (Hmmm...does anyone know how?)

Be sure to cover the brad fasteners with a piece of cardstock to make sure your finished product is nice and clean-looking.

I used drywall tape to break up the plain blue background. I'm telling you, every papercrafter needs to have drywall tape on-hand.
They have lived on opposite sides of the country pretty much all of their lives, so there really aren't many pictures of just the two of them together. I thought this baby picture was cute, no?
I love this denim ribbon by Stampin' Up! I wish I could buy/make denim-looking paper. (Hmmm...does anyone know how?)
Be sure to cover the brad fasteners with a piece of cardstock to make sure your finished product is nice and clean-looking.
Wednesday, July 20, 2011
Mishmash: Part 2
Alas, here is another mishmash masterpiece. Let me just say that making mishmash cards has been so liberating for me. I am so OCD. The fact that these colors don't really match seems to work for me, though.
Try it! Throw all of your scraps and stuff into a big pile and go to town. You might surprise yourself! Share your creations by leaving a link to your blog in the comments section below.


Try it! Throw all of your scraps and stuff into a big pile and go to town. You might surprise yourself! Share your creations by leaving a link to your blog in the comments section below.
Tuesday, July 19, 2011
A Mishmash of Color & Stuff
Mishmash is actually a word. Did you know that? It really is. It's in the dictionary, so it must be legit, right? It's spelled "mishmash" or "mishmosh," however you prefer. Either way, it means the same thing. "A hodgepodge of stuff." (That's a HODGE podge, not a MOD podge...hee hee :) )
In the ever-ongoing process of cleaning my craft room, I decided it was finally time to finish all of the half-finished card projects that were cluttering my desk and getting on my nerves. I decided to blend everything together...I put EVERYTHING, including scraps of paper and embellishments that could never seem to find homes, in one big pile, grabbed coordinating colors, and went to town.
Here is today's example of a mishmash card. I'm pleasantly surprised with the results. These are colors that I would never use all together at the same time, yet somehow they seem to work.
You know what they say...desperate times call for desperate measures. I have been desperate to clean that room, and darn it, one day it will happen.


Come back tomorrow for an even more mishmashed card. You'll be inspired.
In the ever-ongoing process of cleaning my craft room, I decided it was finally time to finish all of the half-finished card projects that were cluttering my desk and getting on my nerves. I decided to blend everything together...I put EVERYTHING, including scraps of paper and embellishments that could never seem to find homes, in one big pile, grabbed coordinating colors, and went to town.
Here is today's example of a mishmash card. I'm pleasantly surprised with the results. These are colors that I would never use all together at the same time, yet somehow they seem to work.
You know what they say...desperate times call for desperate measures. I have been desperate to clean that room, and darn it, one day it will happen.
Come back tomorrow for an even more mishmashed card. You'll be inspired.
Monday, August 30, 2010
Halloween Party Invitation Template & Tutorial
Now that you have your masks made, below is an invitation you can make for a fun party for your daughter and her friends and their dolls. I like the color combos, don't you? They are kind of creepy and classy at the same time. :)


Let's get started making this fun pocket invitation!
Click HERE for the template.
For this card, we are going to use the pocket template for a 5" x 7" card. (The template also includes a pocket for a 4 1/4" 5 1/2" card.)


Now you try it!
Subscribe to:
Posts (Atom)